How to setup and connect DPD Local
Connecting your MyDPD Local account to your Zenstores Dispatch account is a simple process, for a full guide on how to do this please see below.
Please note: DPD and DPD Local are treated as two separate courier integrations.
PLEASE NOTE:
Before you start shipping your orders with DPD Local you need to request and print test labels that must be sent to DPD Local and approved.
This process is mandatory before you start dispatching orders with DPD Local and if it is not followed, this may cause a number of issues to your business including:
- Orders being refused by the DPD Local network but still charged
- Orders going missing and not received by your customers
- Worst case scenario, your DPD Local account being suspended or cancelled
Summary of the DPD Local setup process
- Make sure you have a MyDPD Local account
- Submit the test label request form to be emailed DPD Local test labels
- Print and send test labels to DPD’s Technical Support team for approval
- Wait for an email confirming your account has been approved for use with Zenstores, then complete the DPD Local setup process in Zenstores
Step by step setup process
Before you can start using your DPD Local account with Zenstores you will first of all have to create test labels for DPD to approve.
Requesting test labels:
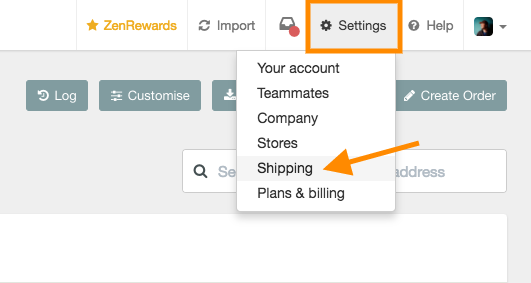
1. First of all hover over settings and click shipping
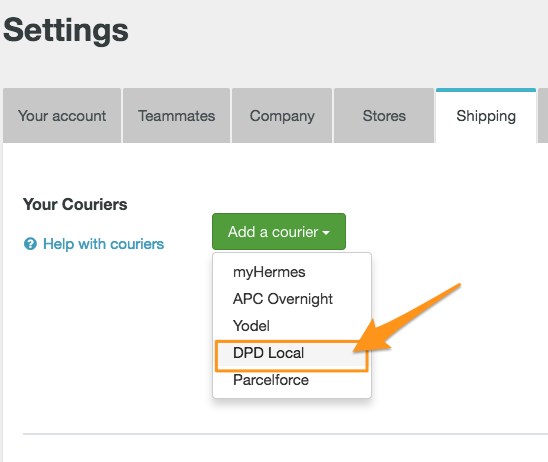
2. Then click Add a new courier and select DPD Local from the dropdown list.
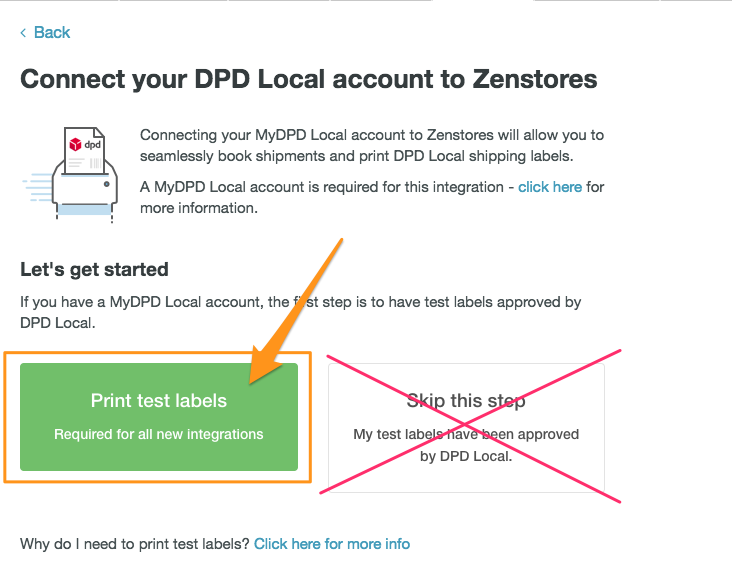
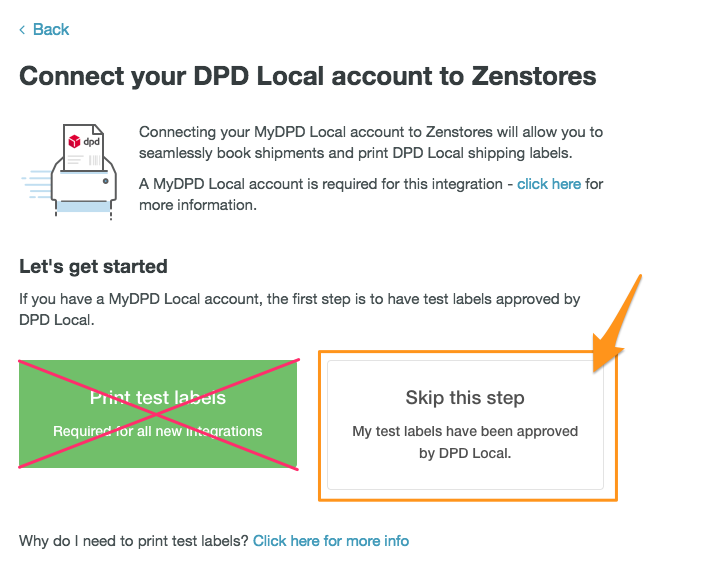
3. Next click the Print Test Labels button.
Do not at this time click the Skip this step button, you will come back to this later.
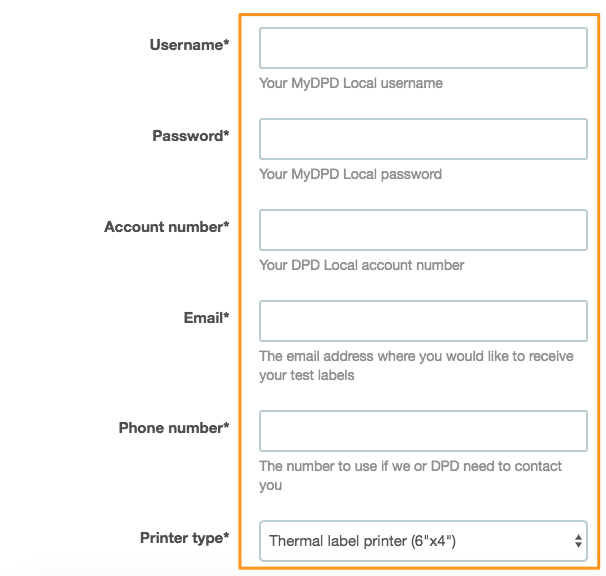
4. Next, you will need to input all your MyDPD account information.
- Username (Your myDPD Local username)
- Password (Your myDPD Local password)
- Account number (Your DPD Local account number)
- Email (that you'd like your test labels sent to)
- What kind of printer you will be using (Thermal labels or A4)
Please note: If you don’t have a MyDPD Local account, you’ll need to get in touch with DPD Local to request one.
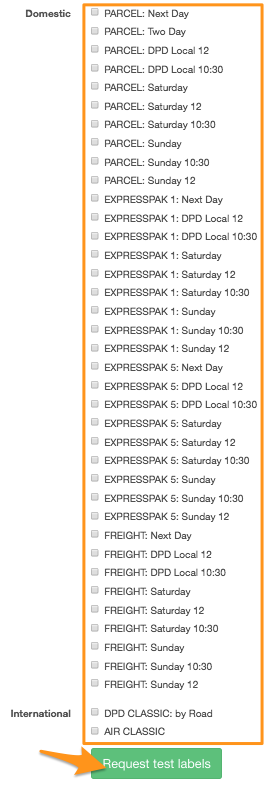
5. Then using the checkbox's select all the services that you have access to in your DPD Local account and click Request test labels.
Please note: Don't' select services that you don't have access to as this will cause errors and slow down your integration
6. Your test labels will then be emailed to you along with full instructions on how to print them and how to get your test labels sent to DPD's approval team.
Once you have sent off your test labels the next thing to do is wait for an email from DPD's customer service team approving them.
Activating your live MyDPD Local account:
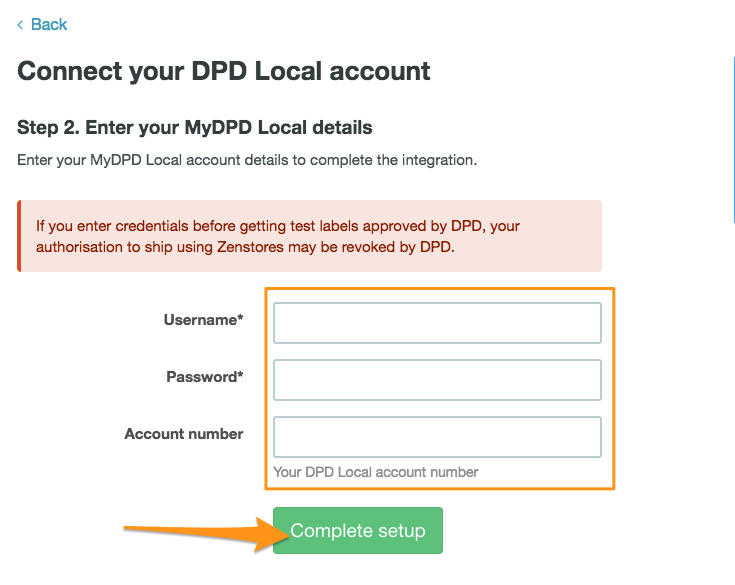
1. Once you have received a reply from DPD's approval team approving your test labels navigate to back to the DPD Local connection page (stage 3 of the previous tutorial).
This time you can click the Skip this step button.
2. Then you just need to input your MyDPD Local credentials.
- Username (your MyDPD Local username)
- Password (your MyDPD Local password)
- Account number (your DPD Local account number)
FAQ's
How to print the test labels
- When printing test labels, please set the scaling on your printer to 100%. Also, set the printer label type/paper size to 102 x 102 mm with no margin. For further information for printing the test labels with DPD's Citizen printer please see this help guide: How to print thermal DPD test labels using a Citizen CLP-521 printer
What services should you select
- Please ensure you only select services which you have access to through your MyDPD account
How long should it take?
- It usually takes between five and seven days for test labels to be approved once received by DPD’s Technical Support team. However, it can occasionally take longer.
Requesting test labels
- When requesting test labels please ensure you only select services which you have access to through your MyDPD account